As an Amazon Associate I earn from qualifying purchases.
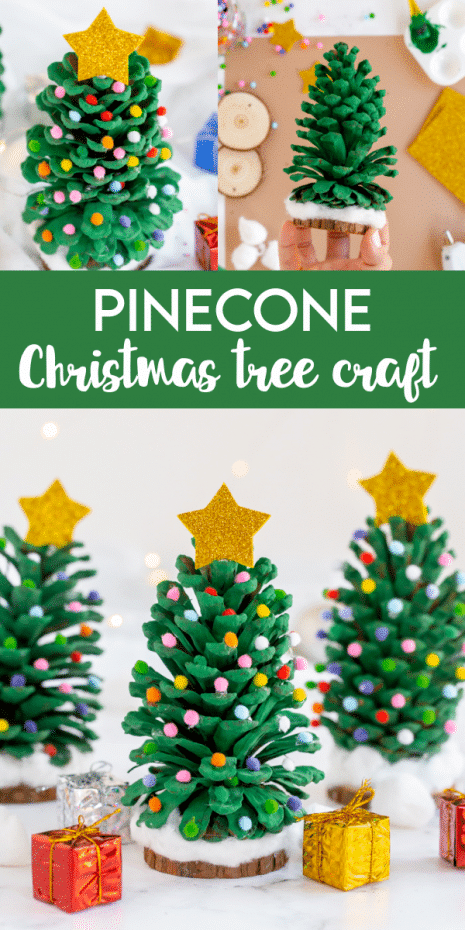

This Pinecone Christmas Tree Craft is a festive holiday DIY your kids will enjoy! Make adorable Christmas trees with pinecones, paint and colorful pom poms!

PINECONE CHRISTMAS TREE CRAFT
These pinecone Christmas trees are so easy to make and use minimal supplies, an ongoing trend here at Made to be a Momma- we like to keep things simple! They make adorable holiday decorations or fun gifts to give to grandparents or your children’s friends. You can grab any size pinecones from your backyard, big or small whatever works! If you have a hard time finding enough pinecones from your backyard you can also grab some from your local craft store or find pinecones for crafts on Amazon.
HOW TO VIDEO:

What can I do with these pinecone trees?
Since you are making your own decoration, you can change the colors to match your real Christmas tree and other holiday decorations. These trees are bright and colorful and that might not be everyones style! My kids personally love all the bright happy colors. Here are a few ideas to get you started:
- Line a few of them up along your mantle.
- Use them as centerpieces on the table.
- Place a doily under them on a coffee table.
- Set them up under the tree while waiting for Santa to bring presents.
- If you use smaller pinecones, place an ornament hook, or string on the top and use them as tree ornaments.
- String several of them together to make a customized garland strand.
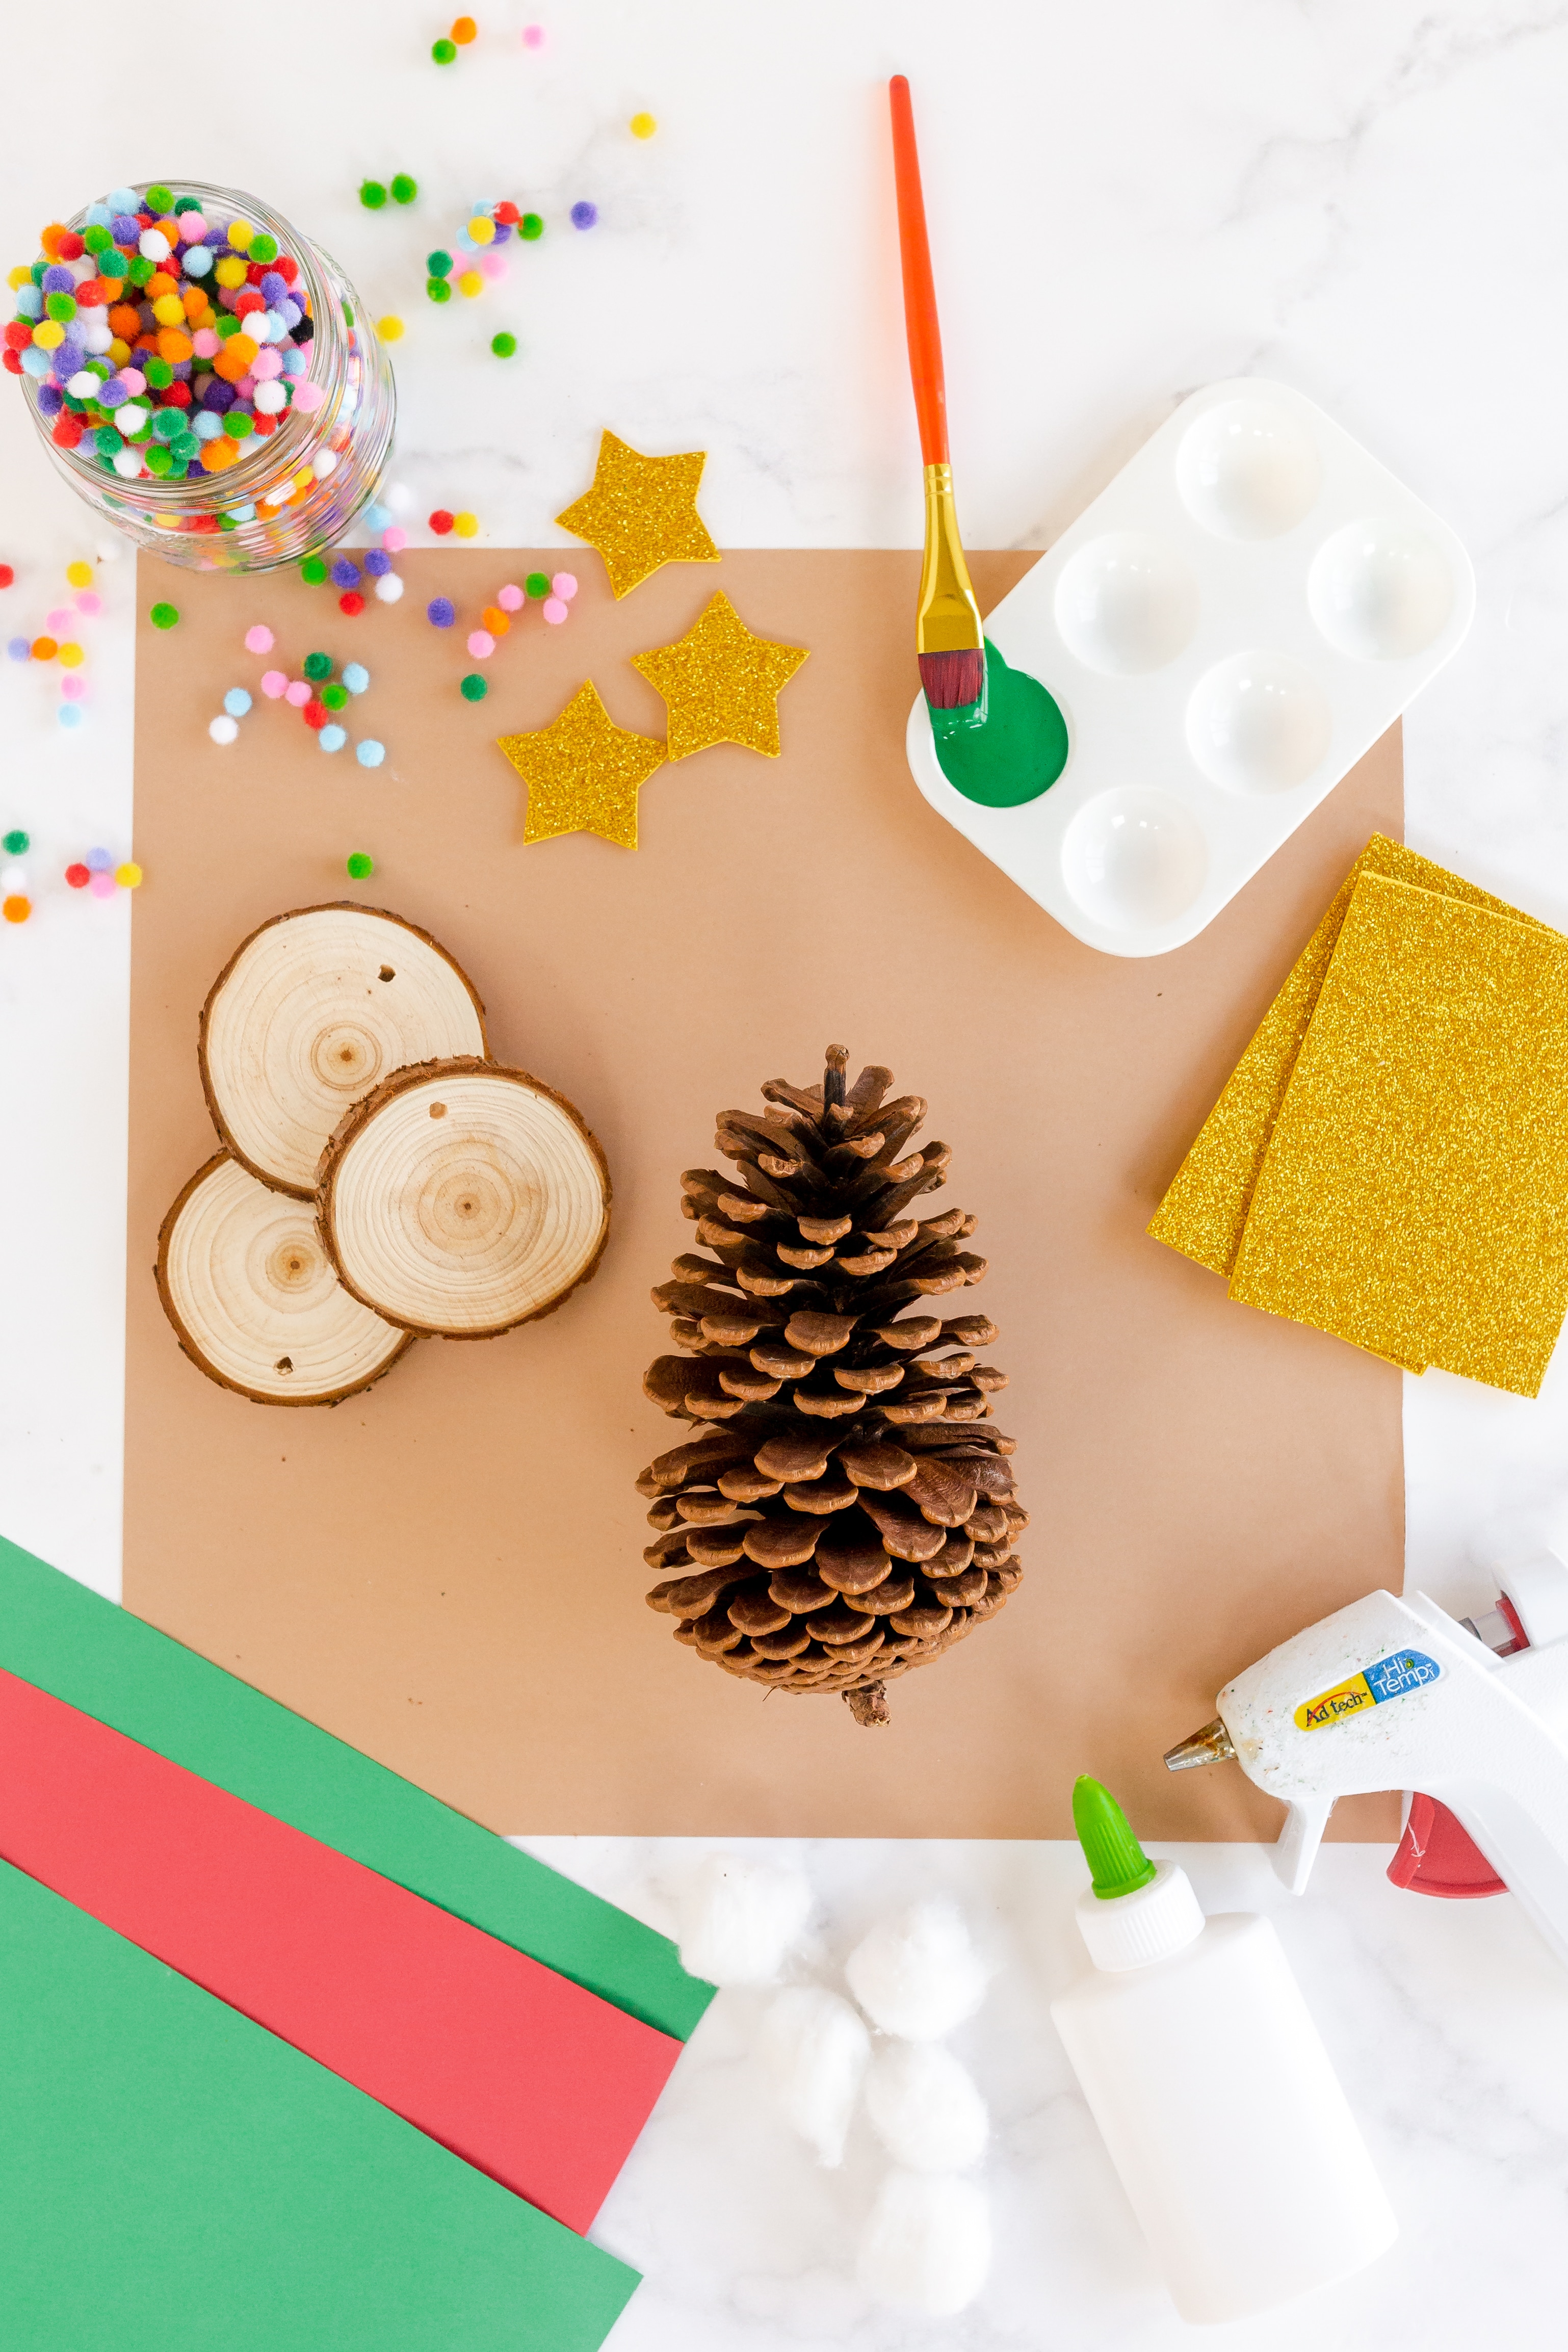
What you’ll Need to Make this Pinecone Christmas Tree Craft
You’ll need to make sure you have these items on hand:
- Pinecones, we used 4-5 inch tall ones
- Wood Slices, we used 2-4 inch size ones
- Mini pom poms
- Green paint, I prefer to use a higher quality craft paint like FolkArt
- Cotton balls
- Gold glitter foam or paper
- Glue (both regular and hot glue)
How to Make Pinecone Christmas Trees
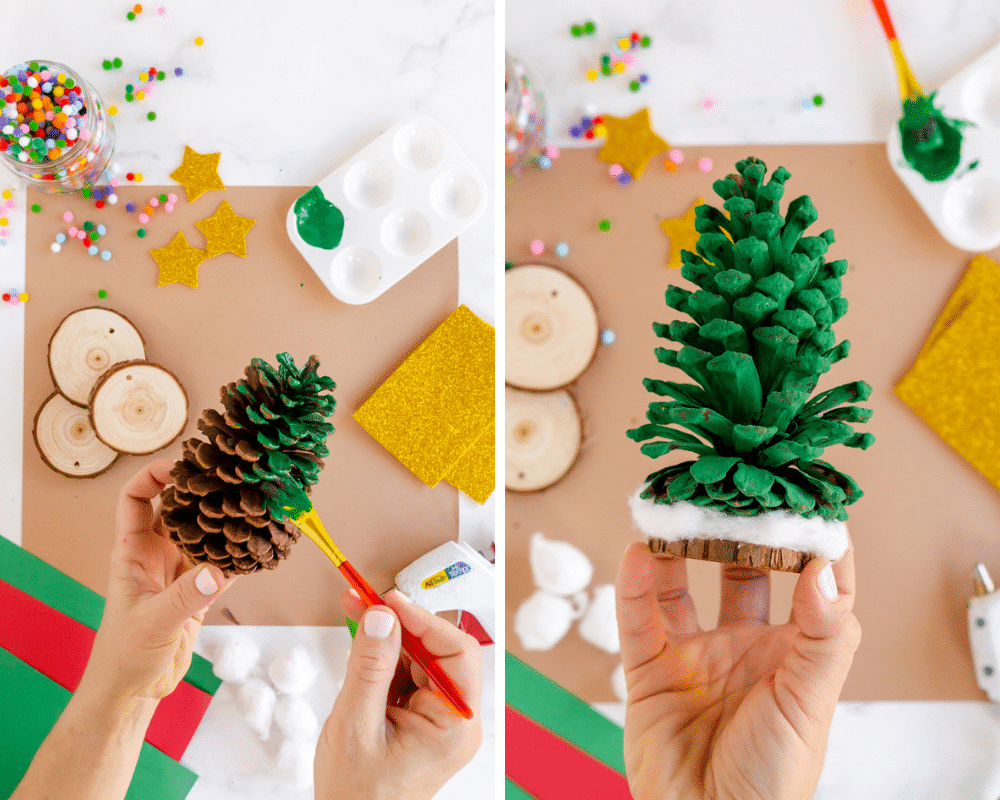
- Use green paint to paint the pinecone as well as you can. They are bumpy and can be a bit tricky. It doesn’t have to be perfect. I have found that it works to just shove the brush into all the little spots. Don’t worry about missing little areas, they will just look like the brown branches you see in a real tree.
- Let the pinecones dry completely.
- Trim off any of the little “sticks” on the bottom of the pinecone. This is important so you’ll be able to glue it down flat.
- Hot glue (adults only) your pinecone to a wood slice. Be sure to use hot glue as it will give you the best hold. Other glues will not hold.
- Take a few cotton balls and carefully stretch them out or pull little pieces away. Then glue it around the base of the pinecone tree so it looks like snow. If the tree needs help standing upright, you can use some of the cotton in specific areas that will help it stand as upright as possible.
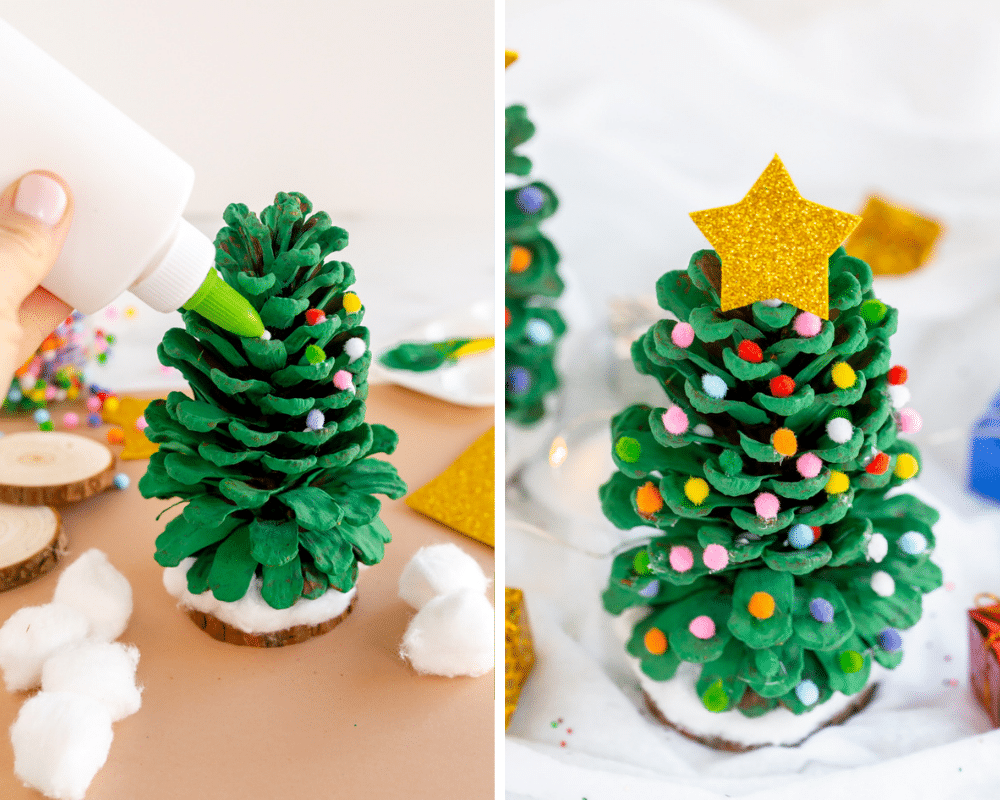
- After the pinecone has dried, start gluing the little pom poms all around the tree
- Cut out a gold glitter star from the foam or paper. Then, glue it to the top of the tree
What kind of paint should I use?
I use green acrylic paint for painting the pinecone. Tempera paints might work, but they can also chip off and make a mess. Acrylic paint will stick to the pinecone’s texture well. I also used a very small paintbrush to try and reach all the smaller areas.
What if I want snow?
The cotton around the bottom will give the illusion of snow. However, if you want to have snow on the tree’s branches, you can use some white acrylic paint to create snow on the branches by painting the tips of the cones.

DIY Pinecone Christmas Tree
Supplies
- pinecones we use 4-5 inch tall
- wood slices we use 2-3 inch
- mini pom poms
- Green craft paint
- Cotton Balls
- Gold Glitter Foam or Paper
- Glue
Instructions
- Use green paint to paint the pinecone as well as you can. They are bumpy and can be a bit tricky. It doesn’t have to be perfect. I have found that it works to just shove the brush into all the little spots. Don’t worry about missing little areas, they will just look like the brown branches you see in a real tree.
- Let the pinecones dry completely.
- Trim off any of the little “sticks” on the bottom of the pinecone. This is important so you’ll be able to glue it down flat.
- Hot glue (adults only) your pinecone to a wood slice. Be sure to use hot glue as it will give you the best hold. Other glues will not hold.
- Take a few cotton balls and carefully stretch them out or pull little pieces away. Then glue it around the base of the pinecone tree so it looks like snow. If the tree needs help standing upright, you can use some of the cotton in specific areas that will help it stand as upright as possible.
- After the pinecone has dried, start gluing the little pom poms all around the tree
- Cut out a gold glitter star from the foam or paper. Then, glue it to the top of the tree
Video


Love this! A great project for my grandchildren and I to do together. Thanks so much!