
No Scratch Baby Mittens
As an Amazon Associate I earn from qualifying purchases.
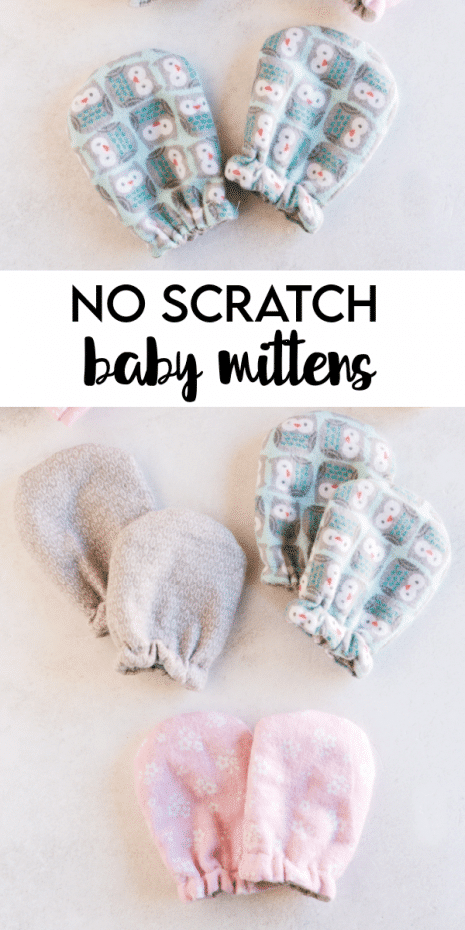
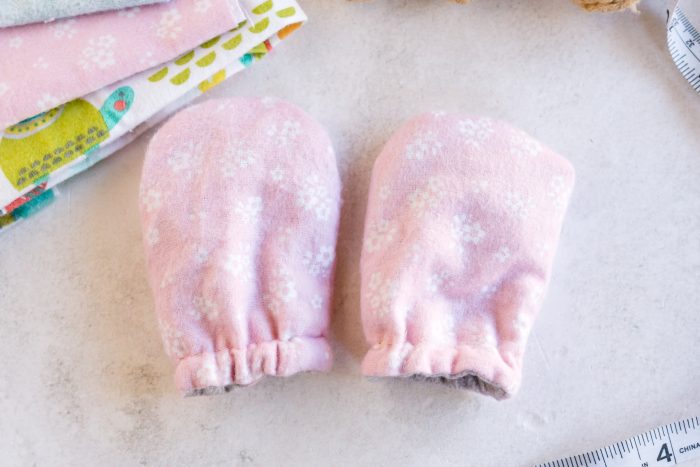
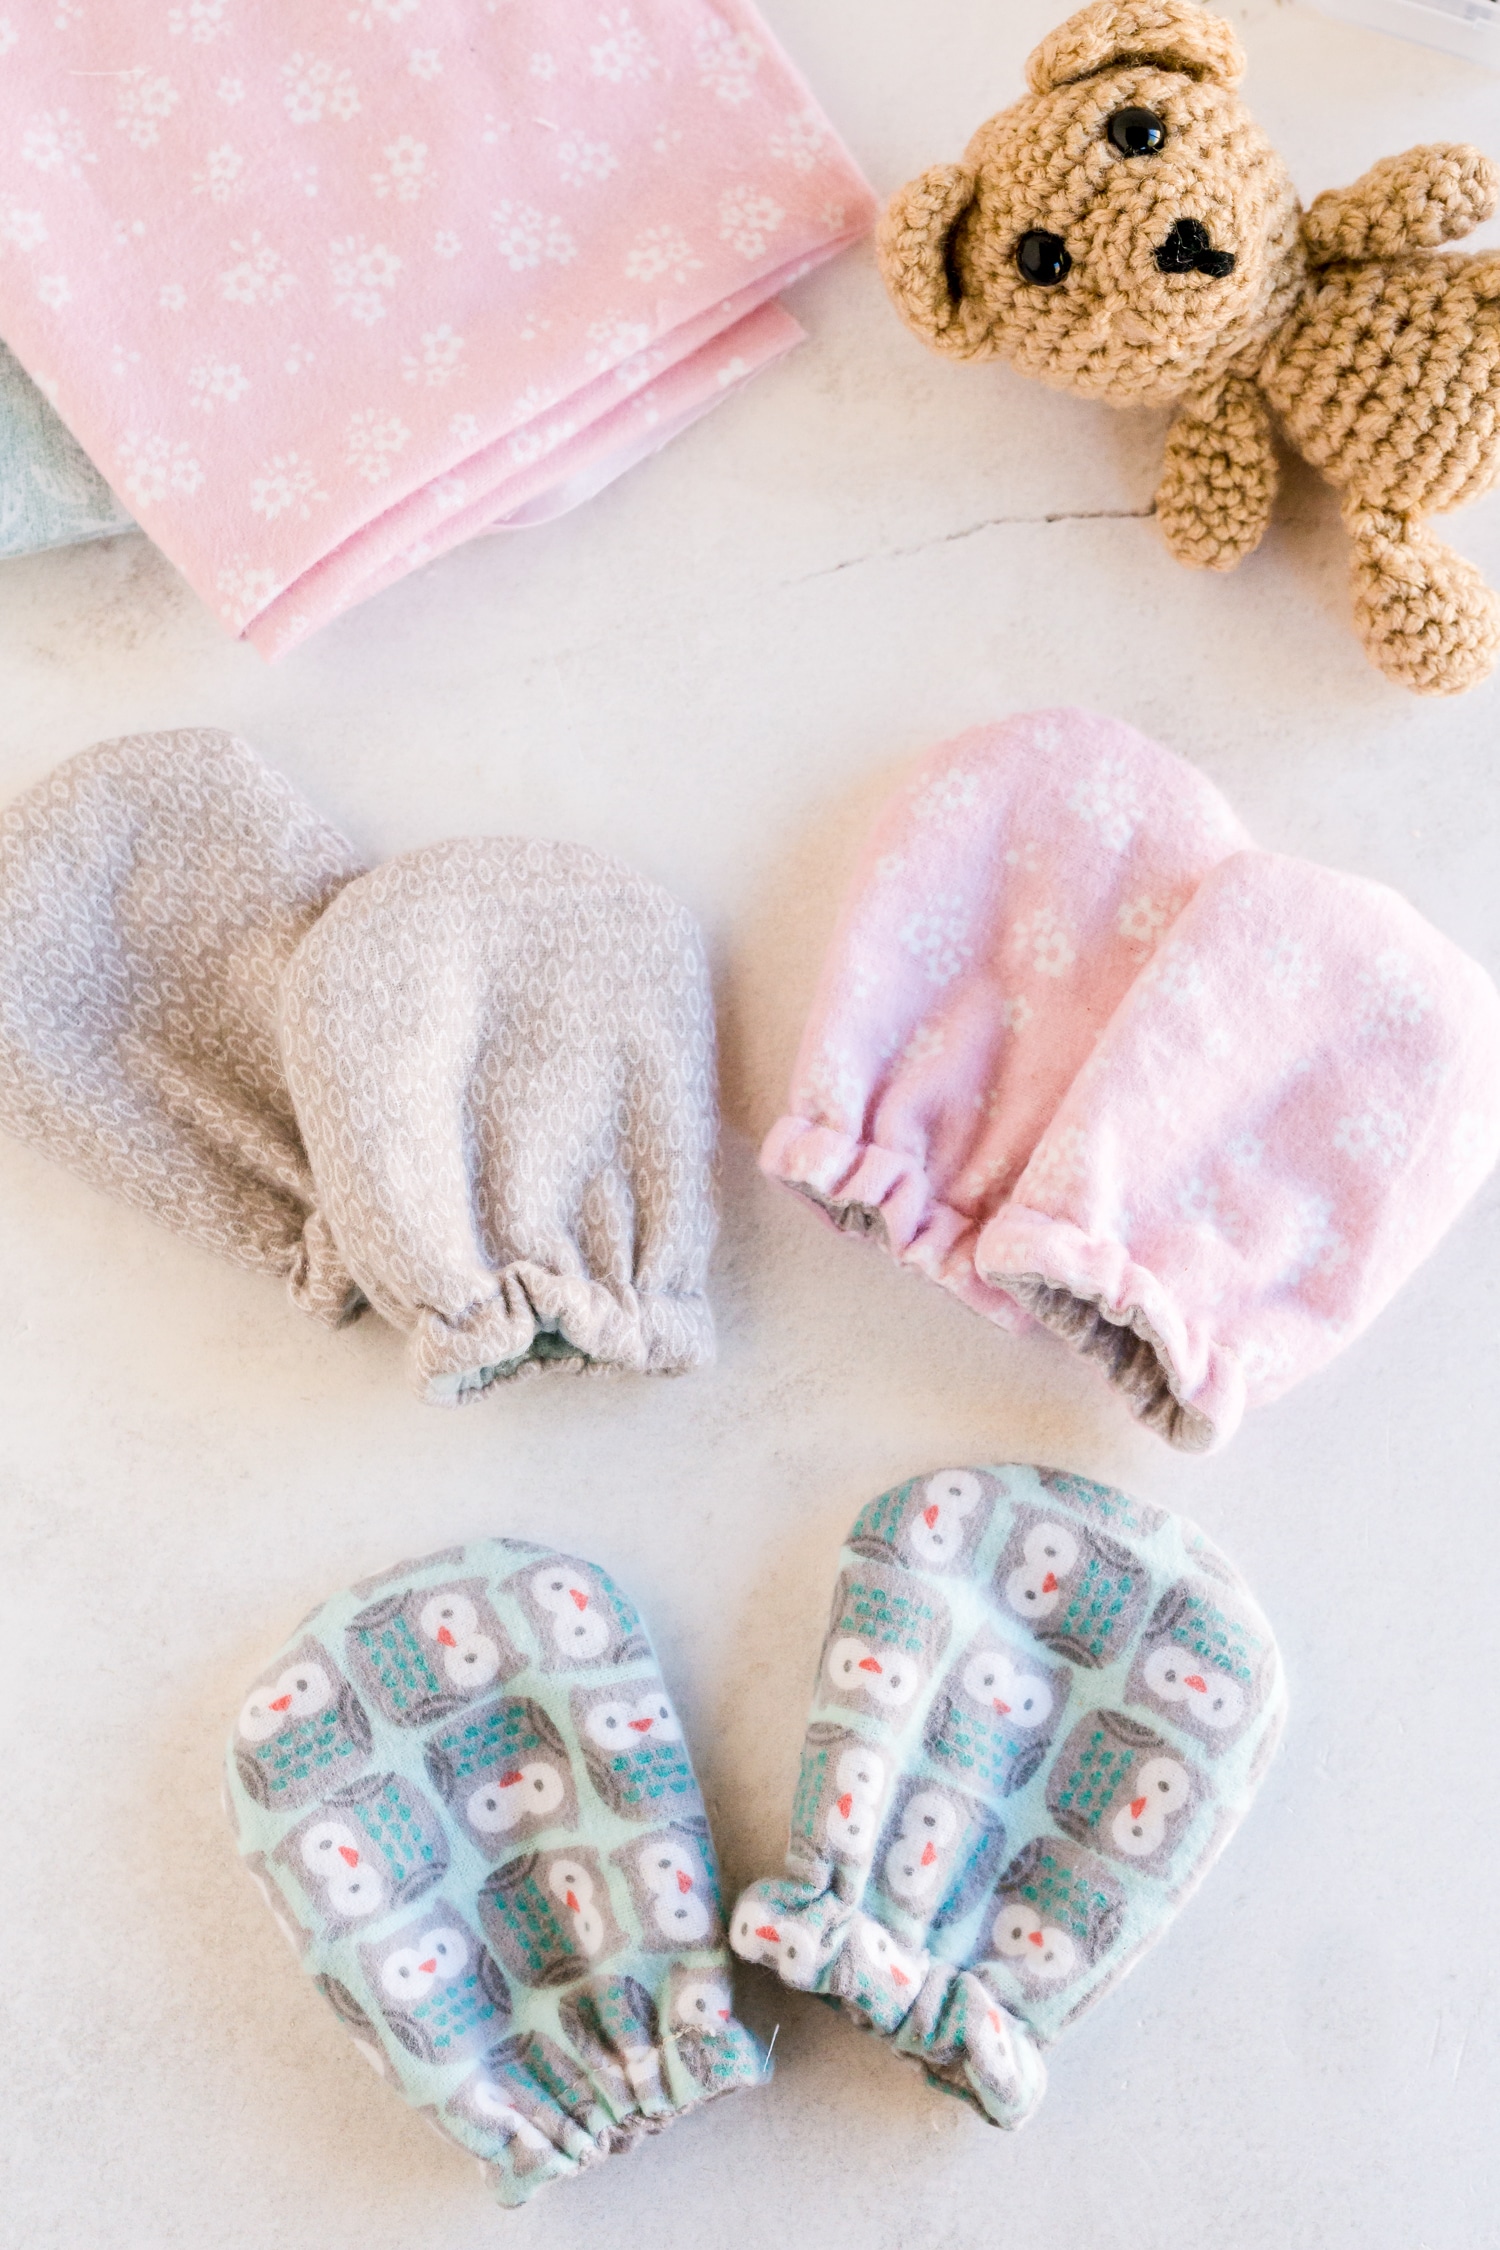
No Scratch Baby Mittens will keep your baby’s fingers nice and warm! Swap out a light weight fabric for flannel during the summer months.
NO SCRATCH BABY MITTENS
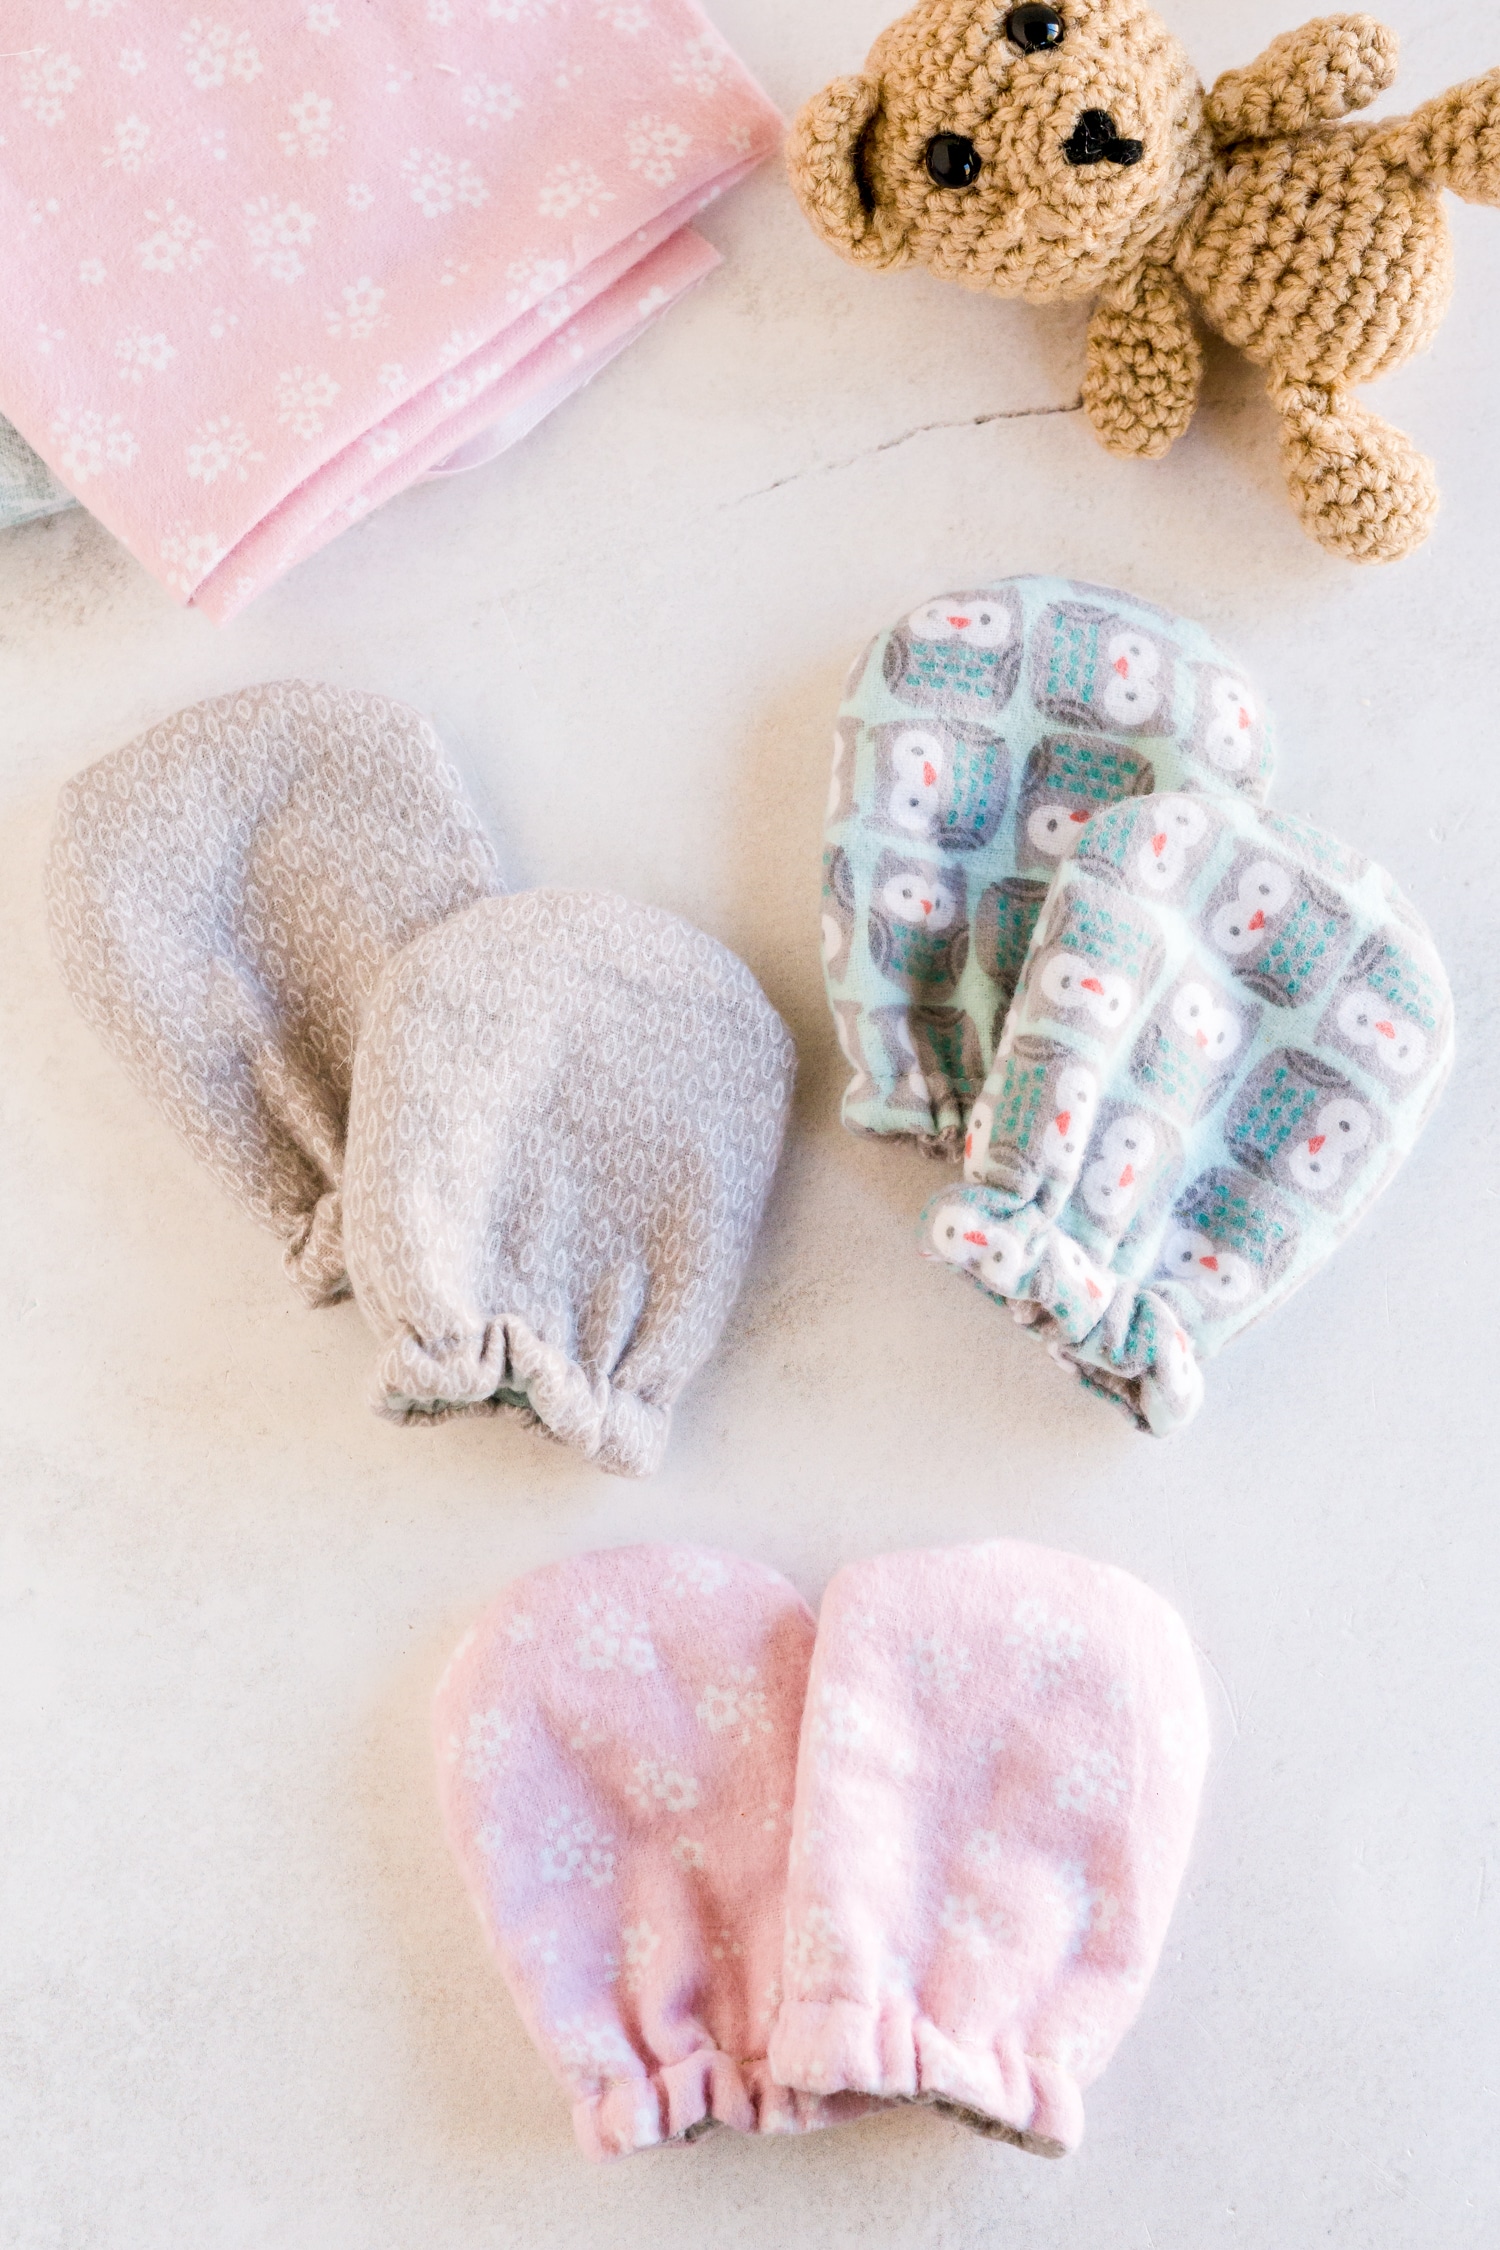
All three of my babies were born doing the cooler months of the year. My oldest was born early April, which in Pennsylvania is still pretty cold. Carter was born in January and my daughter Addyson was born in November. These no scratch baby mittens were made out our flannel for my babies but these can easily be made with two lighter cotton fabric pieces for those hot summer babies.
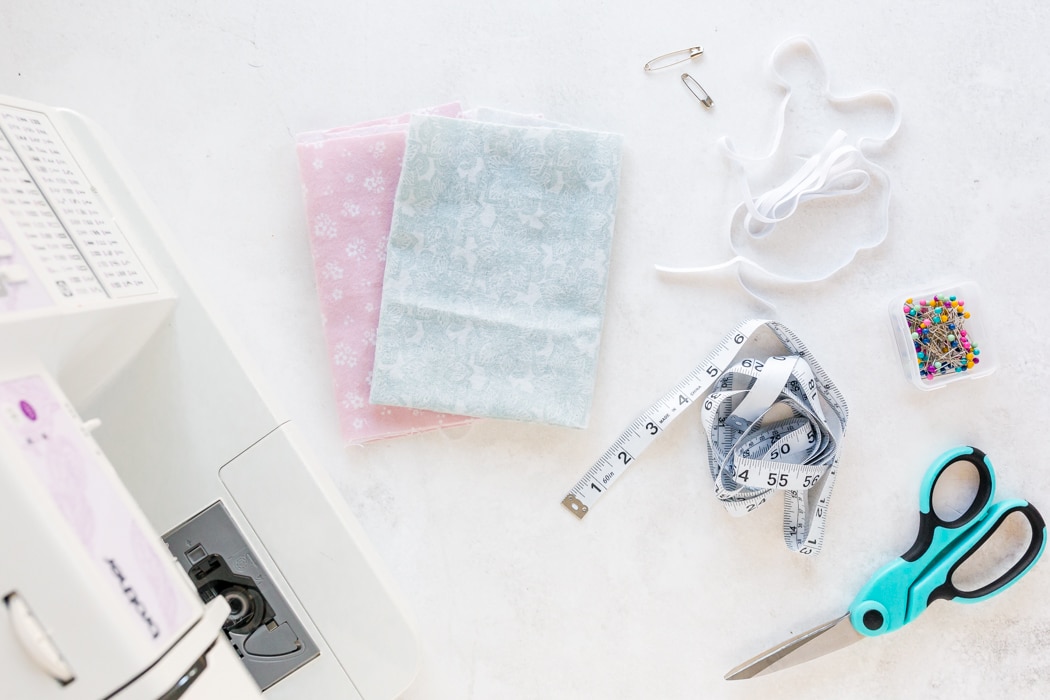
Baby Mittens Materials:
- 1 fat quarter for Main Fabric pieces
- 1 fat quarter for lining
- (2) 4 inch pieces of 1/4 in. elastic, you may need to make the elastic smaller for a smaller baby
**These mittens may be a tad bit too big for a newborn. These mittens fit my babies best around 6 months and older. If you want to make these for a newborn I would make the overall mitten size in step 1 about 1 inch smaller**
How to Make No Scratch Baby Mittens:
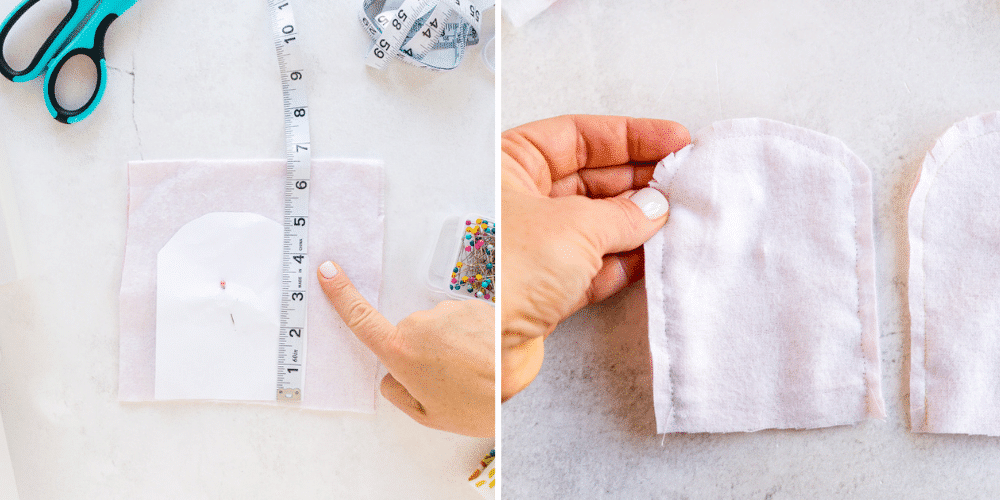
1. Start off by cutting out a mitten type shape. Mine was about 4 inches wide and 5 inches tall. At about 4 inches I rounded the top. You will need to cut TWO Main pieces and TWO lining pieces per mitten. You should have 8 fabric pieces for a set of mittens. Again, if you are making these for a baby smaller than 6 months I would downsize this a bit.

2. Lay your two MAIN pieces RIGHT sides together and sew around the edge with a 1/4 inch seam. Clip the curve of the mitten so it lays nicely once turned. Turn your main piece right side out.
3. Take your two lining pieces and lay them RIGHT sides together and sew. Leave a small opening on one of the sides for turning.
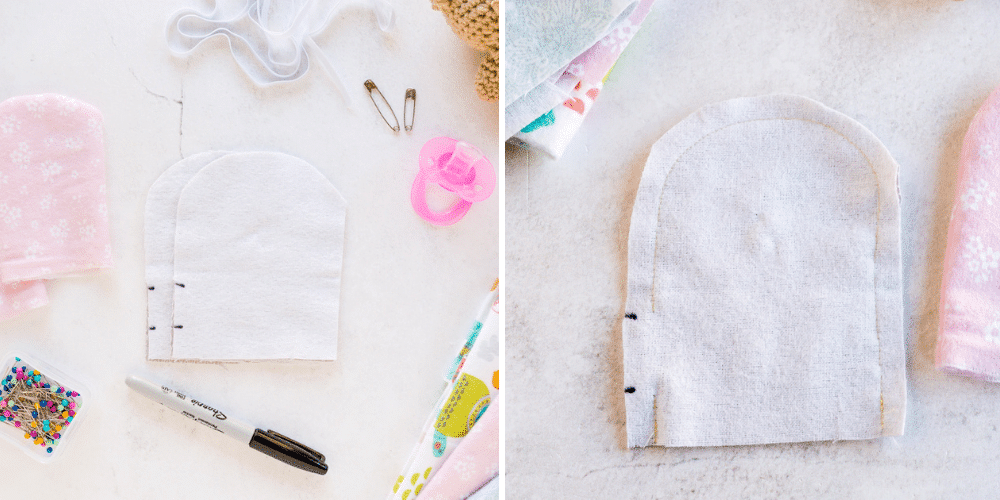
4. While your lining is still inside out, insert your main piece into the lining. The pretty side of the fabrics should be facing each other. Sew around the top edge and turn right side out by pulling your main piece and lining through the opening.
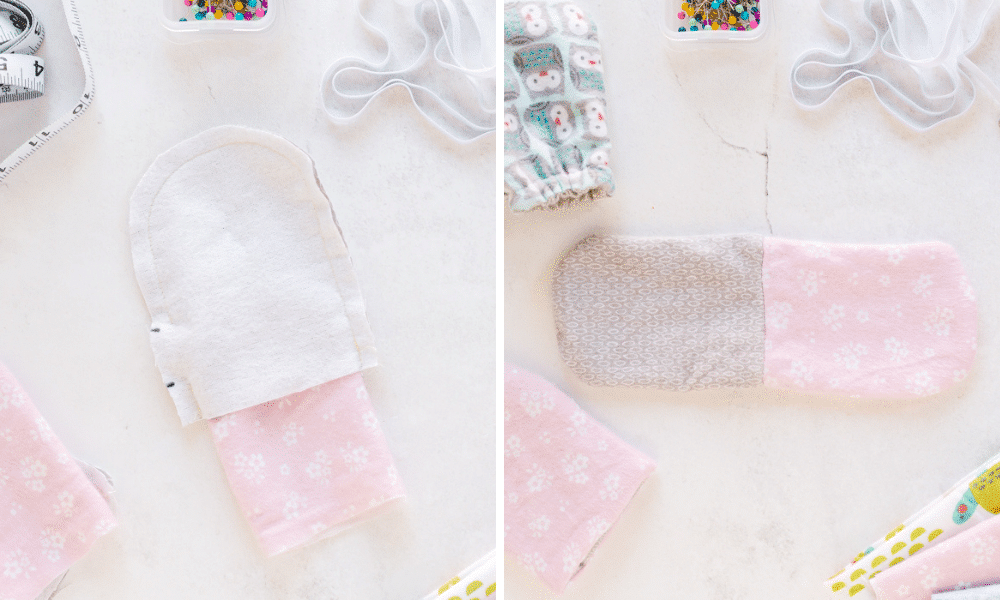
5. Insert lining into your main piece. Topstitch around the edge of your mitten with a 3/8 inch seam making sure to leave a small opening near the opening that is in your lining.
6. After the casing is sewn, you will need to cut your elastic to the size needed. I cut mine at 4 inches. Pin a safety pin on one edge of the elastic and thread it through the casing until it comes out the other side. Make sure you are still holding on to the piece of elastic at the end you started so it doesn’t get lost in the fabric. After you pull your elastic all the way through, sew your elastic pieces together.
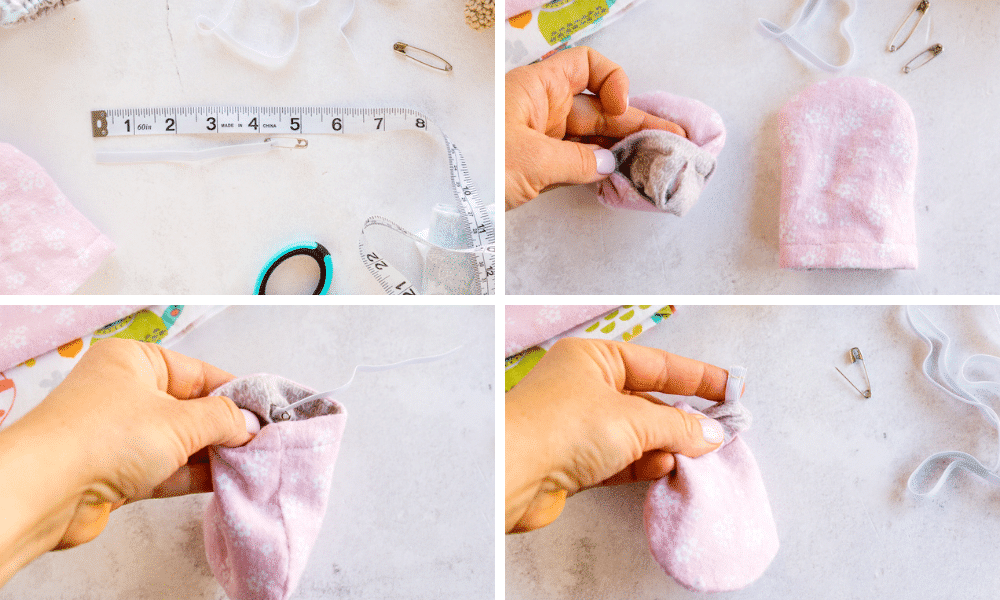
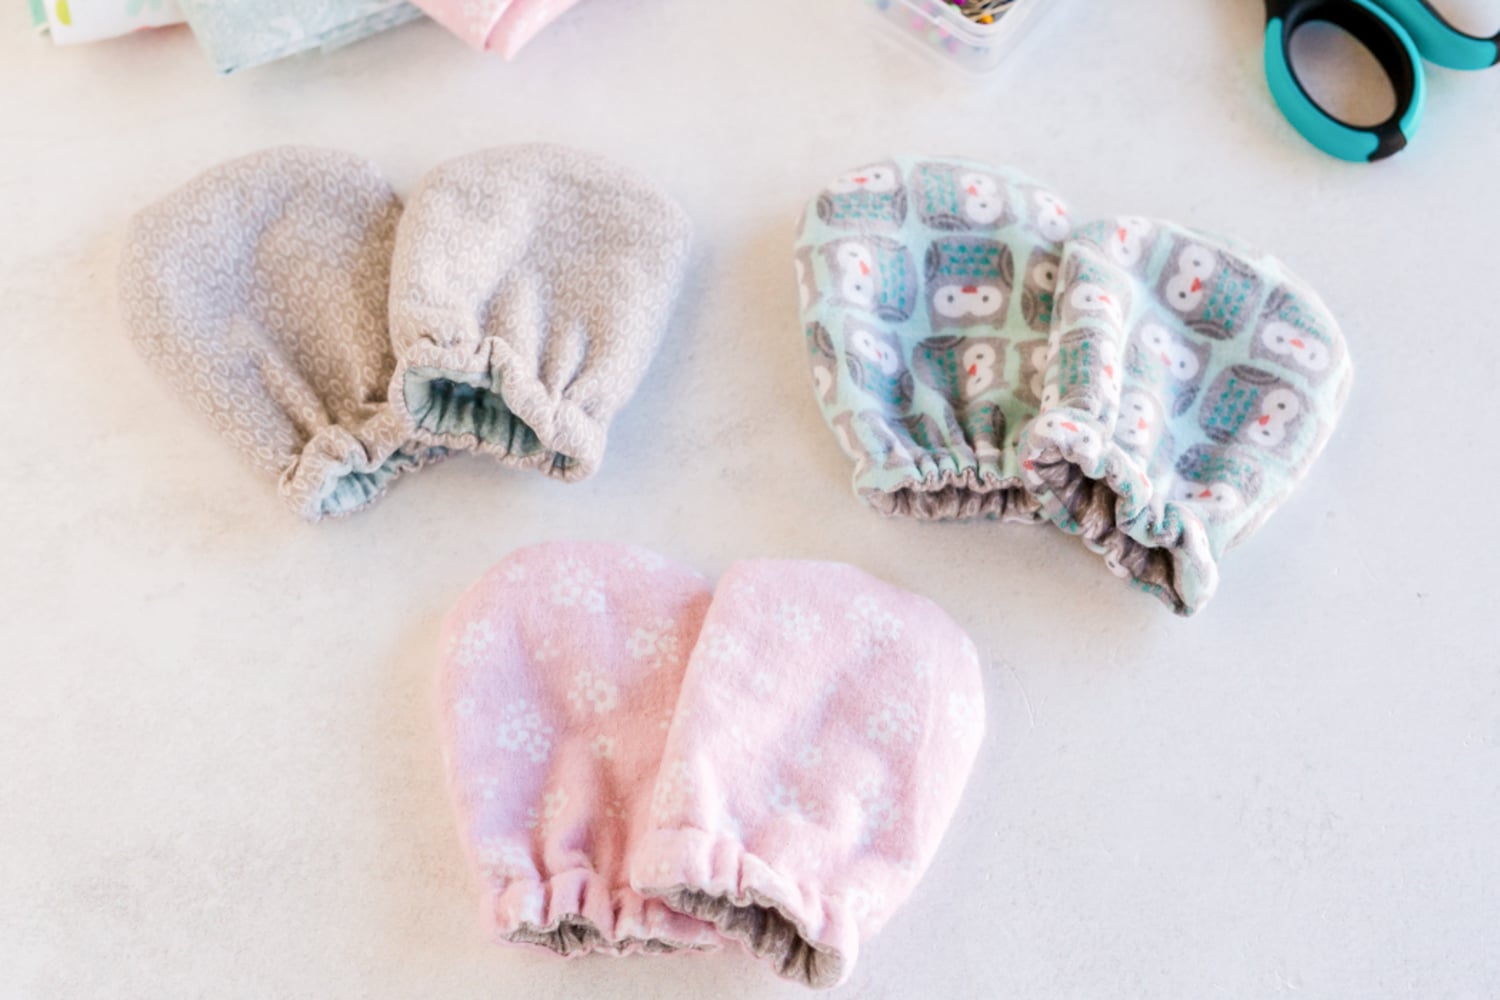
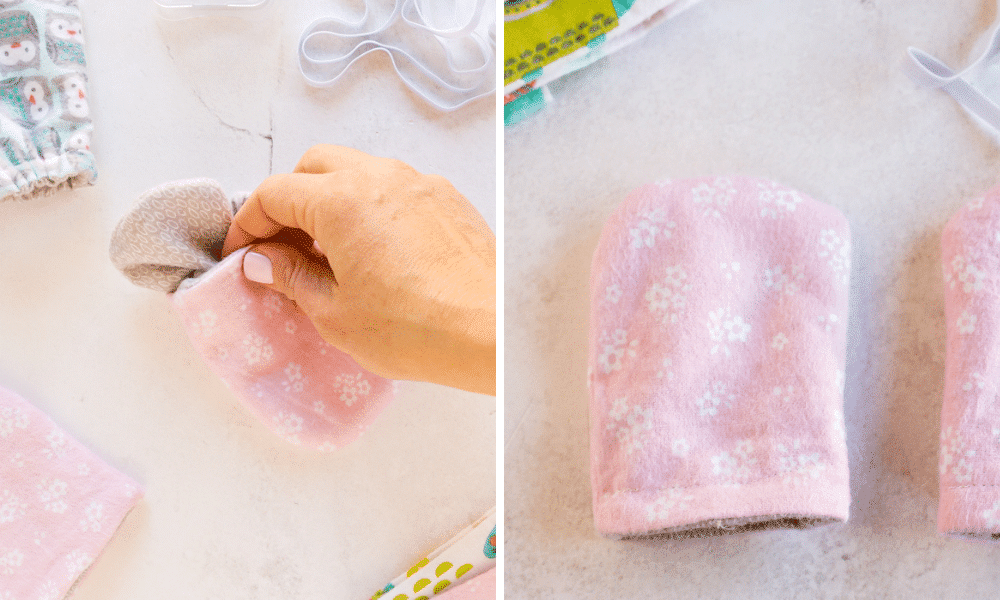
7. Pull your lining out slightly and sew the opening closed along with the top stitch on the outside of the fabric. You should have a perfectly cute, “keep those chubby little fingers warm” mitten.
For more simple sewing projects try these:
This post was published on October 18th, 2012. It has been updated as of December 22, 2020 with new photos and and easier to understand instructions.
Struggled through these directions. It may be helpful to watch an amateur make these mittens so each step can be more thoroughly explained. I made a sleep sack and baby cap before this project yet this one was the most difficult to follow. I may have to find a simpler pattern.
Could ribbon be used instead of elastic?
Has anyone made these for newborns? Just wondering what length to make the elastic? Don’t want it too tight but also want them to stay put. Any advise would be much appreciated, making these for my little girl due in January 😊
This is looking so beautiful. I love it. Thank you for sharing this design.
That looks quite easy to sew.. will try sewing them soon 🙂
Thank you for this tutorial. Love it for my
New granddaughter coming soon.
Hi! Where do I find the free mitten pattern?
I have a serger and made these with fleece without the lining. Super quick and easy. Thanks for an adorable pattern.
These are so cute! I’m not much of a sewer, but I’ve want to start making things like this as gifts. It seems simple enough!
Will be making these for a soon -to- arrive little girl.
Helpful Hint: I found there is less grief if the trailing end of elastic also has a safety pin attached so it can be reclaimed if it slips inside, or mark your measure and add some extra and pin to outside of item until the threading is complete.
Thanks for sharing this.
I can’t find the pattern to cut out to make them.Can you please send it to me thank you very much. My email is [email protected]
From Lorna
With the amount of fabric suggested, could you make more than one pair from the same stock of fabric?
This is a great baby shower gift! I can’t wait to make some of these for my friend who is expecting twins next month! Cute little sewing project – appreciate you sharing it.
What type of fabric should be used – cotton, flannel, fleece?
looks like fleece to me, anything that is cosy i guess.
I am so happy to find this. And I hope it is simple for me. I have a new grandbaby coming. I am so glad to see your statement and love being a mom and homemaker. Your family is blessed. Keep up the patterns so I can do more sewing.
bummer cant see the tutorial pics 🙁
oh I love love love
trying to make these myself im due in four weeks
but im struggling without the pictures to go by, im just a beginner sewer lol
Just made a pair of these. Was happy to find how to make them for a friend having a baby. I will admit, I also like another, got stumped on instructions when it came to the elastic band casing, but using common sense and the photos, was able to figure it out. After that, easy peasy lemon squeezy! Thanks for posting!
thank you new great grand babies can use these…
I tried your tutorial and LOVED it. It was so easy to follow it took me a little time to do the first one. After that they went really fast. Thank you so much.
Hi! My name is Kelly and I blog at Just Another Project (www.kellyjdesigns.com). I am working on a round up post of sewing projects for baby that use up leftover scraps of fabric. I would love to include a link to your Baby Mitten Tutorial. Would it be all right with you if I included your link in my round up, along with a photo from your tutorial?
could you send me pattern for new born baby mittins tried to knit them but not avery good knitter
Hell0 thx for the post…
Everything was going fine until I got to the elastic part. The directions say, “After you pull your elastic all the way through, sew your elastic pieces together and sew your casing closed.”
1. How do u pull the elastic “all the way through” if it is sealed where it was sewn together. The picture shows it sealed on your mitten too to the right of your thumb.
2. How do u push the elastic through so it comes out on the other end and stay sane? Assuming is wasn’t sewn together. The elastic does not cooperate and just perfectly make a complete circle around.
3. Are u pushing it through the casing or under the casing? The picture shows the holes directly under where the casing was sewn. Either way my mittens are sewn all the way down theres no way to push it all the way through.
Please help me!! lol I have followed your directions to the T. I messed up 2 times trying to get it right. I’m on my 3rd mitten and thought I was done until I had all these problems with the elastic.
Yes, the directions for the casing are not clear at all. Any insight would be good! Thanks.
Hi Cheryl,
I updated the directions so hopefully it’s more clear. Let me know if you need more help. 🙂
Hi Friend! I updated the direction in the tutorial! Check it out and if you still have questions please let me know! I will do what I can to help make it more clear! 🙂
I will keep this in mind. Found out that the first grandchild is on the way! Granny has some sewing to do!
Thank you for posting this! I featured your project on a post about amazing baby gift ideas. http://tulipsorchids.blogspot.com/2014/08/20-diy-baby-shower-gift-ideas.html
There is something very confusing to me between steps 5-8. When sewing the lining and the main part, I’ve tried twice doing it the way shown and it did come out the same. The frayed ends still show either way. Am I missing something here?
This is a great tutorial. We can never have too many mittens here in the Midwest. Thanks for sharing.
Donna @onceuponasewingmachine.com
Cuteness! If only we didn’t live in the tropics…
Very cute! I hope you don’t mind me pinning this. 🙂
These are precious! They are perfect the the project we are sewing for charity this month at Hopeful Threads and I have pinned them for those sewing along to check out. Thanks for sharing! 🙂
Adorable mittens! I’d love for you to share these and any other crafts at my new linky party, Submarine Sunday. I hope you’ll stop by!
T’onna
http://navywifeypeters.blogspot.com/2012/10/submarine-sunday-2-features.html